Not such a new practice these days is baking. No not cakes, it's the term used by 3d guys to speed up renders. The method is to have the app create really cool lighting and shadow effects which can be rendered out as texture maps with the effect baked in. I've done some tests with a simple version of this. Say you want some shading where a floor meets the wall. You can paint a texture map which looks like a very fuzzy black line with a suitable alpha or matte channel. Then place on a billboard and put wherever you want shadowing. The same goes for lighting efects on a wall. Like sunlight from outside. Right click textures, then right click edit, gets you into the (colour texture blend options) controls. Enjoy.
T.
Oh BTW I'm moving cities/jobs (film at last!) so my blog enteries may be a little light in the next 2 months.
Thursday, March 13, 2008


Machiniplex - Skype Chat
--------------------------------------INVITE-------------------------------------------
Hi everyone! I am a machinima filmmaker and I manage a site (Machiniplex.com)devoted to quality machinima films. We began in October of 2007 and have "Premiered" 5 machinima films. Recently, I invited filmmaker Tony Bannan to Premiere his film "Folie a Duex" at machiniplex. If you frequent this site much you'll know that Tony won the recent Antics "Medical Theme" contest with his film. I asked him if we could present his film at our site and in addition have a Question and Answer session with him on Skype. He agreed and will be appearing on Skype this Sunday March 16th at 1pm (Pacific Time) to discuss the making of his film and to answer questions. For those who have never heard/used Skype, it is a free internet voice/chat program favored by machinima filmmakers for discussions and collaboration since it can connect people from all over the world via voice or text. Check Skype.com for details. If you don't have a microphone, you can use your keyboard and join a text chat. "Folie a Duex" is an excellent film; well made, imaginative and uses the Antics program to its best. Come by our Skype chat if you'd like to talk to Tony and learn more about this terrific film. -Ricky GroveMachiniplex.com
Hi everyone! I am a machinima filmmaker and I manage a site (Machiniplex.com)devoted to quality machinima films. We began in October of 2007 and have "Premiered" 5 machinima films. Recently, I invited filmmaker Tony Bannan to Premiere his film "Folie a Duex" at machiniplex. If you frequent this site much you'll know that Tony won the recent Antics "Medical Theme" contest with his film. I asked him if we could present his film at our site and in addition have a Question and Answer session with him on Skype. He agreed and will be appearing on Skype this Sunday March 16th at 1pm (Pacific Time) to discuss the making of his film and to answer questions. For those who have never heard/used Skype, it is a free internet voice/chat program favored by machinima filmmakers for discussions and collaboration since it can connect people from all over the world via voice or text. Check Skype.com for details. If you don't have a microphone, you can use your keyboard and join a text chat. "Folie a Duex" is an excellent film; well made, imaginative and uses the Antics program to its best. Come by our Skype chat if you'd like to talk to Tony and learn more about this terrific film. -Ricky GroveMachiniplex.com
Sunday, February 24, 2008
I WON!
 Wow, I won the Medical Comp! How cool! I loved seeing the other entries. The whole reason I started this blog was to build a community where we got to share each others work and swap battle stories!
Some really cool clips came out of the comp, and there are some cool clips showing up on the Antics gallery now. I love the Pawn trailer, and the Coward clips, the July Snow clip strikes a cord as does the Diamond Chaser and Have a Ball pieces.Crash Test's opening sequence is really cool (that stuff looks easy but it's always harder than it looks), & Medical Antics (I need a machine like that). My current fav is Antics ER. I love anything that takes the micky out of the establishment. Also I liked the soundbyte at the head. Anyway here is the Folie clip on a larger display along with a Folie COMPARE clip which helps show what can be done even without a post pass. Just for interests sake here is the Looking Back along with it's compare clip Looking Back COMPARE.
 Some of you may have seen the tower I built, it was driven by a post on the forum which mentioned multi-level sets as being a feature Antics had over it's competitors. The tower ended up featuring in my Folie clip, along with the chopper. I was really happy with the chopper blades, I duplicate three blade sets and offset them slightly, adding levels of transparency gave them the feeling of motion blur. The low angle shots in particular looked good. The other scene I had in my head very early on was the bathroom sequence. I wanted to mess around with the concept of a mirror image.
So I built the bathroom set with a picture frame cutout on one wall. Then I pinned the hands of two identical characters to each other so that the performance resulted in a mirror image. It was made a little more difficult by the (Head Swap out) adjustment to the character and by the building/matching of a
 duplicate set with lighting on the "otherside". Each tile was a squished cube to allow for the popping out effect. whilst this was tedious it gave nice lighting results as each tile edge caught the light. The naked lady in the bath is achieved by setting the dress texture to invisible. This is also using the head swap out The basin/basin reflection water levels shared one billboard. On the wall, the dress hanging on the towel rack is the original towel but with the dress texture applied. The ship was scaled down (I wanted smaller but 0.01 is the limit). As it turned out the entire sequence evolved and the mirror shots were dropped in the cut. Speaking of the cut, my edit actually ran to 3mins before I re-read the rules
  and found I had to trim 1min off! Doh! The long version is on the tube if you're interested.The next set I built was the padded cell. The cell is actually made of armchairs, which gave it that curved surface feel.
 The corridor set was developed as a way of getting the nurse/trolley moves to also add to the storyline. The little control rooms were really just one room duplicated many times. I used sketchup to quickly build the shape of the room and then Antics a lighting prop to dress the ceilings. I like the guy in the wheelchair. I used the pinning technique to get the girl to push the trolley along. This corridor sequence was always meant to be an opportunity to have lights pass over the character (like in Jacobs Ladder). Didn't quite get there though. The eyes close effect is done with a painted texture map and some spheres for the eyes. The best result was to painted the eyelash in the closed position. If I duplicated the head and had one setup with eyes open I could do blinks! (excited!). My favorite moment is the ocean scene. The ocean is made up of a scaled down rolling hills prop with water texture. The trick was to duplicate the hills prop many times and tile up a very large ocean. The ship was rigged to rock and roll like on a gimble to set poses. Setting rooms to the deck sizes helped the process. So then I simply direct the ship to blendto the poses and made the ocean pass along. These elements appeared in the timeline so it was easy to adjust timings base on the camera move.
The entire content for the Folie clip was derived from the ANTICS content library. This is with the exception of the corridor set and the island. All questions comments are most welcome.
Monday, February 11, 2008
New content
 If you're reading this then there's a good chance you've got Antics.
If not then get it, it's free after all. Anyway, the weakest link to the whole Antics solution is the character creation aspect. So I wanted to appeal to you guys (and girls) to help sort this out once and for all. I need to hear your suggestions and solutions to getting more character content into Antics. Let me start the ball rolling by thanking user "cmbubak" for the FACEGEN tip, The faces in the image are imported as .3ds models and placed onto one of the pirate characters. It took about 2mins! once the head is in position you can attach it to the body's head node in a command line. That way it'll allow you to walk the new character and still use the lookat features. (ish)
I've also checked out Quidam, and poser. I always run into a dead end with the skeleton setup.
Ideally if we can find a solution that doesn't involve 3ds MAX, then that would be heaven.
The main topics for discussion are FACE MAPPING and SKELETON RIGGING.
Please, if there's anyone out there......
Friday, February 8, 2008

Monday, February 4, 2008
lighting

Some really cool lighting setups can be achieved within antics, take this
"Livetime Partner for one night love" store.
The lighting is achieved with 5 lights! and it's straight from Antics.
Comments welcome.
The lighting is achieved with 5 lights! and it's straight from Antics.
Comments welcome.
Sunday, February 3, 2008
Adding frosted glass to your texture library
Ok, now I need to say clearly "TRY THIS AT YOUR OWN RISK" but I'm quite fond of the frosted glass texture which comes with one of the doors.
Thing is, I wanted it in my standard glass texture folder, to save me loading that door every time. So here's the thing, find the frosed_glass.tga and copy it to
C:\Program Files\Antics\Antics3.0\Content\Base\Textures glass\maps
now find the glass_frosted.ksh and copy that to
C:\Program Files\Antics\Antics3.0\Content\Base\Textures glass\shaders
Now save your project and you'll be in biz.
The Frosted glass texture will now appear in the glass textures folder.
This method may not be supported officially, but it works!
Thing is, I wanted it in my standard glass texture folder, to save me loading that door every time. So here's the thing, find the frosed_glass.tga and copy it to
C:\Program Files\Antics\Antics3.0\Content\Base\Textures glass\maps
now find the glass_frosted.ksh and copy that to
C:\Program Files\Antics\Antics3.0\Content\Base\Textures glass\shaders
Now save your project and you'll be in biz.
The Frosted glass texture will now appear in the glass textures folder.
This method may not be supported officially, but it works!
Friday, February 1, 2008
Land of the Giants
 Got an email request from Mr W. -Hi, I'm trying to create a scene in Antics V3 where a giant is chasing normal sized people. Do you know if there is a way to scale up my giant so he looks much taller in than everyone else?
 There is a trick with this that might work, it's borrowed from one of the lord of the rings effects. The hobbit on the cart with gandalf was achieved 'in camera'. That is, the smaller hobbit and the larger wizard were in fact two full size adults sitting on the same rig. The principle is simple, objects closer to camera appear bigger. 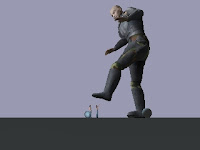

Now, because Antics has not got a depth of field (that is there is no focus) the objects further from camera appear smaller than those up close without focus giving it away. In this way you can have characters running away from a giant by positioning the characters at different distance from camera. It's a limited approach though. The idea is also helped by scaling prop items in the background and foreground so that the characters appear a set size. It really works for a side shot. In theory you could force this perspective from a top shot also, like from the giants' pov. Just use transparent floor textures on the giants floor, lower the little people's room untile the are, well, little! (further from camera) I think scaling buildings down when showing the size of the giant would help a lot, also run the slow the movements down slightly to give the giant weight. Have fun, and let me know how you get on.
Tuesday, January 29, 2008
Swap geometry

It's possible,even usefull, to be able to swap out the geometry on the timeline. The best example is if you want to have a character to change as a result of say, a blast from a strange transformation wand (ala hpotter style). Or, perhaps like in my example, you may want the characters to cycle through during a handshake. The key is to load a new geometry in the properties tab (select object, right click properties, then select the geometry of a prior loaded character.) Most will allow a swap out, but not all. Also you may find some weird eyeball repositioning.
This also works on props, so next time you want a burger to turn into a lemon, just do it in the timeline!
BTW to get the camera to do the move in the sample clip, get a sphere to travel along a path strung between the characters, then have your freecam follow a curved path that sweeps around the talent. Now if you get the freecamera to target the sphere at the start of the timeline, you'll have some great control over when the camera moves and also when it pans!
Sunday, January 20, 2008
Have a Ball
Check out the new clip on the Antics site by CJ AMBROSIA, it's really cool. I like the guy getting hit on the head and the jet shots. Good use of Antics for a cute idea. Be nice to hear how the approached the ball motion. I guess you have some choice there, you could set up a path, get the ball spinning and then have another axis follow the path, you could do it with poses, although only for straight lines, Or, you could use a camera to keyframe the positions and then link your spinning ball to the camera. You only use the camera as a way of getting a keyframable motion. This way you can set your curves, to get the bounce etc. Try spinning the ball on a little room and then tell the room to move around, this might make direction easier.
Anyway, thanks for sharing CJ.
Look forward to the next one.
Anyway, thanks for sharing CJ.
Look forward to the next one.
Monday, January 14, 2008
Not to be used on sheep
Discovered a funny message in one of the texture maps,
"....Also not to be used on sheep or goats or people with three legs or members of the communist party or fish or maybe even.... It is however perfectly reasonable to use......"
Just thought I'd share whilst taking a break from building my little medical clip.
Anyone able to decipher the rest?......
T.
"....Also not to be used on sheep or goats or people with three legs or members of the communist party or fish or maybe even.... It is however perfectly reasonable to use......"
Just thought I'd share whilst taking a break from building my little medical clip.
Anyone able to decipher the rest?......
T.
Monday, January 7, 2008
Getting the doc to push the chair!

Hi, here's my method for getting the Doc pushing a wheelchair, hope you can follow it.
I like to use little sphere's to control my character's hand and feet. The idea here is to create little spheres (about a fist size) and position them right on the wrist of the character. Now pin your guy's hands to the sphere. You'll find the other hand needs a correction rotation.
Once you have you hands pinned, it should look like he is wearing a sphere on each wrist.
I find it easier to position the hands now as the sphere size can be adjusted (using the scale tool )very quickly and the wrist joint can therefore be selected without having to go through the skeleton method.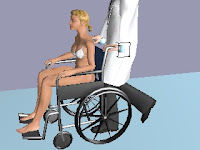
Okay, now for the wheelchair. We'll get two chairs on our set. Make the wheels transparent (bottom of list of textures) for one chair and have only the wheels showing for the other chair. This'll give you the chance to rotate your wheels. If you don't want to have your wheels move then skip this step. Load up a dummy axis and set it to be at the center of one wheel with the blue axis at right angles (perpendicular) to the wheel. Under content, load up the 360_z_anticlockwise animation (it's under animations,prop, rotations). Add the animation to your set. Now go to the Library folder in the Project bin and right click on that animation you just loaded. We are going to set the Cyclic tab to infinite under the Object Properties for that animation. Good. Now test your setting by clicking on the dummy and have it play the rotation animation. You use the waving hand icon. Your wheel should just keep turning and turning and turning. Click interrupt to stop it. Line up your wheels to the chair body and then link the dummy to the chair.
Set each sphere to the handles of the wheelchair so that the doc is in position. He'll end up real close to the back of the seat. O.K. now draw a path along the ground where you want them to go. Position both the doc and the chair to the start of the path. In direct mode, direct your chair to travel along the path, then do the same for your doc. You'll need to tweak the timeline elements until the two are travelling together. Don't forget to tell the dummy to play the rotation animation once the doc starts to walk and then interupt it when he stops.
Good luck! (thanks to Eric for the Cyclic tip)
I like to use little sphere's to control my character's hand and feet. The idea here is to create little spheres (about a fist size) and position them right on the wrist of the character. Now pin your guy's hands to the sphere. You'll find the other hand needs a correction rotation.
Once you have you hands pinned, it should look like he is wearing a sphere on each wrist.
I find it easier to position the hands now as the sphere size can be adjusted (using the scale tool )very quickly and the wrist joint can therefore be selected without having to go through the skeleton method.

Okay, now for the wheelchair. We'll get two chairs on our set. Make the wheels transparent (bottom of list of textures) for one chair and have only the wheels showing for the other chair. This'll give you the chance to rotate your wheels. If you don't want to have your wheels move then skip this step. Load up a dummy axis and set it to be at the center of one wheel with the blue axis at right angles (perpendicular) to the wheel. Under content, load up the 360_z_anticlockwise animation (it's under animations,prop, rotations). Add the animation to your set. Now go to the Library folder in the Project bin and right click on that animation you just loaded. We are going to set the Cyclic tab to infinite under the Object Properties for that animation.
Good. Now test your setting by clicking on the dummy and have it play the rotation animation. You use the waving hand icon. Your wheel should just keep turning and turning and turning. Click interrupt to stop it. Line up your wheels to the chair body and then link the dummy to the chair.Set each sphere to the handles of the wheelchair so that the doc is in position. He'll end up real close to the back of the seat. O.K. now draw a path along the ground where you want them to go. Position both the doc and the chair to the start of the path. In direct mode, direct your chair to travel along the path, then do the same for your doc. You'll need to tweak the timeline elements until the two are travelling together. Don't forget to tell the dummy to play the rotation animation once the doc starts to walk and then interupt it when he stops.
Good luck! (thanks to Eric for the Cyclic tip)
Here is Dr Phil taking another patient for an extreme makeover!
Sunday, January 6, 2008
V3 Thoughts - Scale tool
Welcome to 2008. We've all been enjoying the new scale tool in v3, I find it very useful and it opens up some new tricks also. You might have noticed you can adjust the scale of billboards with it but perhaps you didn't know it can be used for paths. When building a reindeer flyover
recently, I wanted the effect of many r'deers on different paths swooping over some poor chap.
I found that if i built the paths in miniture, I could design a nest of paths without having to more the camera very much. Then when I was ready, I just scaled everything by the same value.
Very cool. I'm loving the .fbx from sketchup pipeline now. I wish there was a global (no lighting, etc) option for the texture maps. Also I would like the invisible texture to be moved over to be next to the colour option in the select texture dialogue box.
I like the content browser changes in v3. I often dock this window so that it stays open and I can drag bits into my set.
Working on my medical clip..... catch ya...
recently, I wanted the effect of many r'deers on different paths swooping over some poor chap.
I found that if i built the paths in miniture, I could design a nest of paths without having to more the camera very much. Then when I was ready, I just scaled everything by the same value.
Very cool. I'm loving the .fbx from sketchup pipeline now. I wish there was a global (no lighting, etc) option for the texture maps. Also I would like the invisible texture to be moved over to be next to the colour option in the select texture dialogue box.
I like the content browser changes in v3. I often dock this window so that it stays open and I can drag bits into my set.
Working on my medical clip..... catch ya...
Sunday, December 16, 2007
New Face mapping

Welcome to the holiday season!
Just a quick note to check out the Christmas pack.It's very cool.
Our first quadped ! Some very funny clips can be made using the reindeer and biped animation!
Also check out santa's face map, now we can customise left and right sides! Let's hope this is the way all maps are done!!
Of course the first thing I tried was to try and swap out a horse geometry for the reindeer, no luck there, (the horse doesn't have a skeleton, so it's a prop not a character.)
Here's a test using crazytalk5, there's got to be a way of getting this onto my antics santa,
Maybe if I write to Santa.......Dear Santa, I know I've been kinda good, any chance you'll let me project textures onto geometry or something......
Merry Christmas!!
Saturday, December 1, 2007
Comments by Scott Squires
Here are some excerpts from a correspondence I've had with the wonderful Scott Squires who is an incredible visual effects veteran. Some great critque and tips for all previz artists.
Hi Tony,
You've got some nice work. Most of the previs work done here is related to visual effects and heavy stunt work. That usually means some type of action sequence .......
(article continued in comments section)
Hi Tony,
You've got some nice work. Most of the previs work done here is related to visual effects and heavy stunt work. That usually means some type of action sequence .......
(article continued in comments section)
Friday, November 30, 2007
Antics 3d - GAGTRABWTFDAH project.
Antics has a very strong design function which allows you to pin a character's hand or foot to a prop. I read in the manual way back in version 2, something about a bicycle. So I thought I'd give that a go. Let's call it my "Get a girl to ride a bike, with two friends, down a hill project" ..................
(Continued in the comments section!!!)
Update: It's done and on youtube. Great music too.
GIRLS ON BIKES
(Continued in the comments section!!!)
Update: It's done and on youtube. Great music too.
GIRLS ON BIKES
Thursday, November 15, 2007
ANTICS 3D - PERFECT!

Well, I've started on my next little project. I thought I'd go all out and try to make the coolest most elaborately staged film sofar. So here's a sneak preview at how it's coming along. I can't tell you too much about the story (not yet) but I'm hoping to do something kinda cool with this multistory apartment block I've got stuck in the middle of an ocean!
You just gotta love ANTICS. what other progrm will let you build a tower in 30mins and then let you simply click on a guy at the bottom and say 'walk to the top buddy' and then watch him do it. Through doors up stairs etc. back to it...........
Wednesday, November 7, 2007
Monday, November 5, 2007
Wednesday, October 31, 2007
lighting a whole city


On the Antics forum there was some discussion about lighting. This is one of my favorite parts of doing a sequence. Lighting can add so much atmosphere to a scene. But what about lighting an entire city! Well I still think it comes down to the framing of the camera as to what you should light. Antics has 7 lights available, even full sun requires many lights to help "model" subject matter. The key to making the scene interesting is using some touchs of colour. Early light or sunset (Magic Hour) is most favored by cinematographers as it provides good shadows as the source of the light is low in the sky. You can have lots of success if you experiement with the properties of the lights. Another tip is to set your icons to 500 when you have a camera so far away from your set. That way it'll be easier to adjust light positions.
Send in your lighting rigs, I'd love to see them.
Subscribe to:
Posts (Atom)