Friday, June 6, 2008

bouncing ball

There are a number of ways to get your props to move (animate) in a scene.
One way is to 'direct' the prop to a given point in the room and another is to have the prop follow a path which you have created on the floor.
This article goes through some other approaches.

KEYFRAME METHOD
Using a "freecamera" and "attach" combo, it's possible to not only keyframe the move but also you get the advantage of a curve editor as well.
Experiment with attaching a prop to a freecamera. Now open a new viewport for that camera, and use this to control the freecamera, BUT use your master camera view to see what you are doing. If you do this whilst in the direct mode you can keyframe the freecamera. Once you have the move worked out, select the element on the timeline and choose "edit curve". Note, the first and last keyframes can't be adjusted so be careful with where you start and end you camera move. For those not familiar with a curve editor, it shows you the values for the x,y & z position of the camera over time.
You can adjust the curves to achieve different values for the camera position and the way the camera moves from position to position.

In this example I create a camera move to mimmick a bouncing ball.

If you pan the freecamera you will also get control over the rotation of the prop.

An extension of this method is to tell the freecamera to target another element in the scene, in this way you can achieve some dynamic properties. For example, aligning a prop to a specifc angle regardless of position. You can try doing this whilst the camera is on a path also. This is how I got the soccer ball to spin in the Skull Shot clip. (attach the prop to the freecamera, tell the freecamera to follow a path, get the camera to target some things during the travel).

It's my hope that these animation functions become possible in the next release, until then...

Have fun.

T.


Wednesday, June 4, 2008

Rigging a Skeleton Character


To create your very own Skeleton Character you will need, 1 pair of sharp scissors (get your mum to help) 1 sheet of white paper and 1 pencil.....
oops sorry wrong blog....
To make a skeleton character for ANTICS 3D you only need Antics and Sketchup.
Start by finding a skeleton that you like the look of. Pick one which is standing upright and in a T-Pose or close to the rest pose of an Antics character.
Once you've got the skeleton in sketchup open up Antics and bring in a character. (I used the robot).
What where going to do is to move between the two apps for every limb and bone set.

1) The first thing to do is select the desired bone in sketchup then follow these steps, "ctrl c" to copy, "ctrl a" to select all then hit "delete" to clear the page, now choose edit "Paste in Place". This will give you just the bone. Now save as .skp and name it something usefull. (like Lfoot.skp) ok now "ctrl z" to bring back the full skeleton ready for the next piece.

2) in Antics, import the Lfoot.skp and do not move it. (you may want to apply a scale as you import if the object is too small, do the skull as this will help set the scale value) Now notice that in the props list you have a Lfoot file.

3) go back to step 1) and repeat many times....until you have the whole skeleton in.

Now still without moving anything in Antics, Select each prop and right click "edit pivot". You'll want to set the pivot to be where the joint is. (eg a forearm bone pivots at the elbow)

Congrats you have a rigged skeleton!! Now to get the Antics Character to drive it.
The concept here is to closey align your skeleton to the underlying skeleton of an existing Antics Character (AC). The closer your wrist is to the AC's wrist the better
the animation. You can select all the props that make up your sekeleton and scale, move and rotate the whole set into a position 'within' the AC. Ok. Now I used a command to get each bone attached the the AC joint. If you haven't checked out the command console, do yourself a favour. It's in View/Command Console.... once open type (tip... once you start to type you'll see a list of valid syntax, just select the word you want and then press space bar, now you can start on the next entry)
it should read

attach Lfoot Robot_01 Bip01 L Foot

This command will attach your skeleton's leftfoot to the AC's Lfoot. (I chose a robot as my Antics Character)

Do this for all your bones and you are done. Now hide the AC. Select the AC in the character list and direct it to walk somewhere, or do something and you'll have your new character.

If you want another skeleton character, select the AC in the Set/Character list, CTRL D and then Ctrl V.

This procedure of mapping rigid bodies to AC skeletons/joints can also be applied to ANTICS Animated props.

view example

Monday, June 2, 2008

FREE STUFF and SKULL SHOT


A good supply of free motion capture (.bvh) is mocapdata.
Also if you are in need of a no-nonsense audio editor try Audacity

I for one like the term ANYMATION which Overman has forwarded to the Antics Forum. original article I had heard the term used in dscussion here and there and I think it is closer to describing Antics clips than the Machinima label. I don't think it's the best name, I'm just not offended by it.

On another note, I had a little fun with my newly built skeleton dudes, now that's using your head!
T.
(btw, I did the sound also)

Thursday, May 29, 2008

WELCOME ANTICS USERS


If you're new to this blog welcome, remember when you get to the bottom of this page there's another few packed full of tips and stuff. Also check out this article
as well. It's makes for some interesting reading. All comments welcome.
Happy Antics -ing!

Monday, May 26, 2008

Skeleton walks - DFA


Today is my birthday and I thought it would be cool to map a skeleton bone for bone with an antics character. Well it took a while but the results are way cool. Now I have a skeleton that walks! Here's a little taste of what I'm thinking of doing with him. cheers. (it's dfa direct-from-antics)

Saturday, May 24, 2008

Emotions for Antics!

HOT OF THE PRESS May 23, 2008 •
"..............we now have Ian Wilson working alongside our development team in Cambridge. Ian is the founder and CEO of Emotion AI (http://www.emotionai.com) and over ten years of experience in Europe and Japan of applying technology to simulate how humans react . .....................It will take some time to integrate an emotions into Antics and make them as easy to use as we, and you, would like and fit them in with other developments, so you will have to be patient for a while. In the meantime, don’t forget that there are ways to get emotional impact in Antics videos using music ,camera cuts etc. – Tony Bannan’s videos “Looking Back"...........".full story

Friday, May 23, 2008

Ned Kelly Dance


Ned Kelly is an Australian icon. He was a bushranger, who, to aviod being shot whilst robbing banks, built a helmet and chest plate forged from iron. I guess he was the first ironman! Anyway I've built a little Ned out of lego and animated them in Antics. The pieces are imported separately and linked to various joints on a standard character. Once everything is hooked up the legoman will do everything the ref character does. Then it's a matter of hiding the ref character.

The lego parts are freely availble from Ldraw and LeoCad. There are hundreds of lego style props to import into antics to create your own lego clip! Good luck.


Wednesday, May 14, 2008

zombie

A zombie effect can be achieved easily when you combine the pin tool with the link tool. The setup is just like the "pushing wheelchair" topic covered in an earlier post, the plan is to create a sphere for each wrist. place the sphere on the wrist and the pin the wrist to the sphere. Now if you link/attach the sphere's to the character then the arm animation will be overwritten (made void). If you place the spheres away from the body then the arms can be set to extebd forward just like a zombie. My favorite zombie films are....I am Legend, 28 days and Shaun of the Dead. Have fun!!


Oh, btw, I got the texture maps from the web, and the character is a cowboy (you may want to experiment with different walk cycles for the character and slower durations in the timeline).


youtube

Monday, May 5, 2008

Reflections

To create a reflection, like the one in my bathroom scene in Folie or in the pond scene by raybearmass is simply a matter of creating an identical set and then rotating it 180 degrees. Sometimes I like to use the frosted glass texture, (it's from one of the doors), to create a material for the glass, then adjust transparency to suit.
raybearmass also found this great app for making your reflections move

On a personal note, I've now started work in my new job in my new city and so I'll post some of my Antics-Lego experiments soon. Thank goddness for sykpe so I can keep intouch with the family.

Friday, May 2, 2008

How to make a Sketchup MECH walk in ANTICS


There is a wonderful tutorial on the Antics Forum, thanks to Robert Kim and Eric Rosoff from the Antics Team.
You can see a sample clip here

Saturday, April 26, 2008

Good Camera placement.

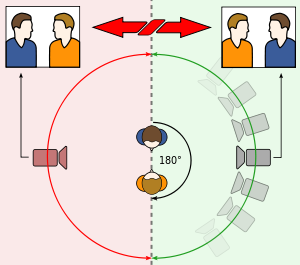
The 180° rule is a basic film editing guideline that states that two characters (or other elements) in the same scene should always have the same left/right relationship to each other. learn more If the camera passes over the imaginary axis connecting the two subjects, it is called crossing the line. The new shot, from the opposite side, is known as a reverse angle. Some filmmakers state that the fictional axis created by this rule can be used to plan the emotional strength of a scene. They believe the closer you place the camera to the axis, the more emotionally involved the audience will be.
Here is an image you might like to apply to a billboard. Use the billboard in your scene to line up your cameras if you wish. Just set the billboard to be half as high as it is wide, and set the texture blend property to ADDITIVE and turn DISABLE LIGHTING on.

Sunday, April 20, 2008

v3.1

A welcome addition to the Antics/previz armoury is the ability to import .skp from Google's Sketchup application. The latest version of Antics V3.1, just released, allows you to import models and textures into Antics in one simple step. The .skp file format joins the .3ds .fbx and .bvh which are already supported.

Sketchup is great buddy to Antics as it also features a simple yet powerful workflow and fast results. It's a 3D software tool that combines a tool-set with an intelligent drawing system, plus you can create models using real-world coordinates. Best of all, it's also free! Check out sketchup .

Another very cool feature is the Google 3d Warehouse option which is just under the import selection. If you are on-line, you will be taken direct to the 3d Warehouse via a window within Antics. Once you've found something you like, it's as simple as clicking on it, follow the prompts and BAM ! it's in your scene ready to go. The process allows you to download free content straight into the scene. (very cool )

You can find out more from the Offical Antics Blog which has also just been launched. (Thanks Gary.)

Tuesday, April 15, 2008

Antics Community Callout!

Antics is such a cool program, the developers have really done a fine job of keeping the product user friendly. The latest move to make the application free has no doubt increased the user base.
So now we have a great variety of users of all skill levels. The aim of this blog is to share experiences and opinions about ANTICS and previz. If you have a story you'd like to share, or a subject you would like covered in depth, please leave your comments, or send me an email. (ammo(at)previz(dot)com(dot)au

I'd like to welcome Gary Conway back to the Antics support team. He was fantastic in helping me through my questions when I first started with Antics!

Saturday, April 5, 2008

MOCAP and Mr Bones

BVH files are motion capture data, which when imported into Antics, allow your characters to replicate the moves made by the original actor. The data is collected by various means, commonly, markers are placed on the joints of the actor so that xyz information can be extracted. Most often this is achieved with little white balls sewn into a catsuit style garment.The actor performs in front of a camera array to collect the info. Data is constructed by then plotting the movement of each ball. Many camera views are required to get accuracy. Another method I saw recently was a solution designed by a N.Z. firm which utilize little geo magnets. In this way the data is much much more accurate and doesn't induce the problems associated with camera rigs, lighting and limb crossover. In fact this approach allows an actor to get on a horse and ride away in full sun on location! Both the actor and the horse can be rigged with the collectors. If you would like to try out the bvh path with Antics, Mr bones has offered a free sample of a Jedi bvh. http://www.truebones.com/JediBones.zip

Sunday, March 23, 2008

animation creation


Here is a video introduction to a free app called qavimator. Developed as a tool for Second Life, it has the abilty to *import, edit and create bvh files. As you all know, with the latest version of ANTICS3D, it's now possible to import .bvh and either have a character "play" the animation or set in the character's properties tab. It's my first vid tut so I hope you like it. I found using the application fairly straightforward. (left click and shift left click and thumbwheel for cam view). Click on a body part and then adjust the sliders on the right. Move your timeline along and set the next pose. A nice feature is the ease in and ease out options with is available for each keyframe. (I'd love for antics to adopt this!) It means your characters movements won't be robotic. If you want to go back and change a parameter then just click on the keyframe in the timeline and off you go. Very clever design, nice job.
I wanted my character to move smoothly from the antics sitting pose to the first frame of the custom animation I was creating. So to align the Antics character with the model in qavi, I set up the Camera views in both apps to match, (the window sizes) and then set the qavi tab to 'Not' protect first frame. Now it was simply a matter of posing my qavi girl to match the Antics girl. It took three gos. So have fun, oh I did discover one bug, the app doesn't like all .bvh files. Let me know how you go.

Update: thanks to JPiazzo
Carnegie Mellon University has a HUGE collection of free motion capture files 2605 in all vailable for download free with no use restrictions. They have a database that you can search and small video files of each motion. They are in tvd, c3d, and amc format not directly compatable with Antics but this tool AMC2BVH, http://vipbase.net/amc2bvh/ will convert them to BVH files also get another free program bvhacker here: http://davedub.co.uk/bvhacker/ you'll need this also.
I downloaded the entire archive here http://mocap.cs.cmu.edu/faqs.php once the CMU .amc file is converted to BVH it will import into Antics - but not perfectly. Most of the problem is in the initial arm offset ( left and right clavicle & humerus joints) also sometimes neckalignment. I have had success editing these files prior to import in the bvHacker program using XYZ offsets.(If you try rclavicle z +19, lclavicle z -19 lhumerus z -50 rhumerus z +50 as a start) Also these files are recorded at 120 frams per second which will play slow in Antics. Bvhackers Frame Time function can re-sample the speed though. You can also trim the moves into smaler parts which is a good idea as some captures are quite long but have many good smaller moves like turns, twists, and walk run stop transitions. I'd be happy to do a tut if I figure this all out.

Sunday, March 16, 2008

Skype discussion on Folie

There will be a skype chat 1pm Pacific time. march 16th. all welcome
just skype ammopreviz or ricky grove to join in.
FolieProduction notes

Thursday, March 13, 2008

Baking Shadows

Not such a new practice these days is baking. No not cakes, it's the term used by 3d guys to speed up renders. The method is to have the app create really cool lighting and shadow effects which can be rendered out as texture maps with the effect baked in. I've done some tests with a simple version of this. Say you want some shading where a floor meets the wall. You can paint a texture map which looks like a very fuzzy black line with a suitable alpha or matte channel. Then place on a billboard and put wherever you want shadowing. The same goes for lighting efects on a wall. Like sunlight from outside. Right click textures, then right click edit, gets you into the (colour texture blend options) controls. Enjoy.

T.
Oh BTW I'm moving cities/jobs (film at last!) so my blog enteries may be a little light in the next 2 months.

Machiniplex - Skype Chat

--------------------------------------INVITE-------------------------------------------
Hi everyone! I am a machinima filmmaker and I manage a site (Machiniplex.com)devoted to quality machinima films. We began in October of 2007 and have "Premiered" 5 machinima films. Recently, I invited filmmaker Tony Bannan to Premiere his film "Folie a Duex" at machiniplex. If you frequent this site much you'll know that Tony won the recent Antics "Medical Theme" contest with his film. I asked him if we could present his film at our site and in addition have a Question and Answer session with him on Skype. He agreed and will be appearing on Skype this Sunday March 16th at 1pm (Pacific Time) to discuss the making of his film and to answer questions. For those who have never heard/used Skype, it is a free internet voice/chat program favored by machinima filmmakers for discussions and collaboration since it can connect people from all over the world via voice or text. Check Skype.com for details. If you don't have a microphone, you can use your keyboard and join a text chat. "Folie a Duex" is an excellent film; well made, imaginative and uses the Antics program to its best. Come by our Skype chat if you'd like to talk to Tony and learn more about this terrific film. -Ricky GroveMachiniplex.com

Sunday, February 24, 2008

I WON!

Wow, I won the Medical Comp! How cool! I loved seeing the other entries. The whole reason I started this blog was to build a community where we got to share each others work and swap battle stories!


Some really cool clips came out of the comp, and there are some cool clips showing up on the Antics gallery now. I love the Pawn trailer, and the Coward clips, the July Snow clip strikes a cord as does the Diamond Chaser and Have a Ball pieces.Crash Test's opening sequence is really cool (that stuff looks easy but it's always harder than it looks), & Medical Antics (I need a machine like that). My current fav is Antics ER. I love anything that takes the micky out of the establishment. Also I liked the soundbyte at the head. Anyway here is the Folie clip on a larger display along with a Folie COMPARE clip which helps show what can be done even without a post pass. Just for interests sake here is the Looking Back along with it's compare clip Looking Back COMPARE.
Some of you may have seen the tower I built, it was driven by a post on the forum which mentioned multi-level sets as being a feature Antics had over it's competitors. The tower ended up featuring in my Folie clip, along with the chopper. I was really happy with the chopper blades, I duplicate three blade sets and offset them slightly, adding levels of transparency gave them the feeling of motion blur. The low angle shots in particular looked good. The other scene I had in my head very early on was the bathroom sequence. I wanted to mess around with the concept of a mirror image.
So I built the bathroom set with a picture frame cutout on one wall. Then I pinned the hands of two identical characters to each other so that the performance resulted in a mirror image. It was made a little more difficult by the (Head Swap out) adjustment to the character and by the building/matching of a duplicate set with lighting on the "otherside". Each tile was a squished cube to allow for the popping out effect. whilst this was tedious it gave nice lighting results as each tile edge caught the light. The naked lady in the bath is achieved by setting the dress texture to invisible. This is also using the head swap out The basin/basin reflection water levels shared one billboard. On the wall, the dress hanging on the towel rack is the original towel but with the dress texture applied. The ship was scaled down (I wanted smaller but 0.01 is the limit). As it turned out the entire sequence evolved and the mirror shots were dropped in the cut. Speaking of the cut, my edit actually ran to 3mins before I re-read the rules and found I had to trim 1min off! Doh! The long version is on the tube if you're interested.The next set I built was the padded cell. The cell is actually made of armchairs, which gave it that curved surface feel.
The corridor set was developed as a way of getting the nurse/trolley moves to also add to the storyline. The little control rooms were really just one room duplicated many times. I used sketchup to quickly build the shape of the room and then Antics a lighting prop to dress the ceilings. I like the guy in the wheelchair. I used the pinning technique to get the girl to push the trolley along. This corridor sequence was always meant to be an opportunity to have lights pass over the character (like in Jacobs Ladder). Didn't quite get there though. The eyes close effect is done with a painted texture map and some spheres for the eyes. The best result was to painted the eyelash in the closed position. If I duplicated the head and had one setup with eyes open I could do blinks! (excited!). My favorite moment is the ocean scene. The ocean is made up of a scaled down rolling hills prop with water texture. The trick was to duplicate the hills prop many times and tile up a very large ocean. The ship was rigged to rock and roll like on a gimble to set poses. Setting rooms to the deck sizes helped the process. So then I simply direct the ship to blendto the poses and made the ocean pass along. These elements appeared in the timeline so it was easy to adjust timings base on the camera move.
The entire content for the Folie clip was derived from the ANTICS content library. This is with the exception of the corridor set and the island. All questions comments are most welcome.

Monday, February 11, 2008

New content

If you're reading this then there's a good chance you've got Antics.
If not then get it, it's free after all. Anyway, the weakest link to the whole Antics solution is the character creation aspect. So I wanted to appeal to you guys (and girls) to help sort this out once and for all. I need to hear your suggestions and solutions to getting more character content into Antics. Let me start the ball rolling by thanking user "cmbubak" for the FACEGEN tip, The faces in the image are imported as .3ds models and placed onto one of the pirate characters. It took about 2mins! once the head is in position you can attach it to the body's head node in a command line. That way it'll allow you to walk the new character and still use the lookat features. (ish)

I've also checked out Quidam, and poser. I always run into a dead end with the skeleton setup.
Ideally if we can find a solution that doesn't involve 3ds MAX, then that would be heaven.

The main topics for discussion are FACE MAPPING and SKELETON RIGGING.

Please, if there's anyone out there......