
Hi, here's my method for getting the Doc pushing a wheelchair, hope you can follow it.
I like to use little sphere's to control my character's hand and feet. The idea here is to create little spheres (about a fist size) and position them right on the wrist of the character. Now pin your guy's hands to the sphere. You'll find the other hand needs a correction rotation.
Once you have you hands pinned, it should look like he is wearing a sphere on each wrist.
I find it easier to position the hands now as the sphere size can be adjusted (using the scale tool )very quickly and the wrist joint can therefore be selected without having to go through the skeleton method.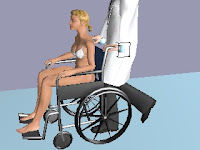
Okay, now for the wheelchair. We'll get two chairs on our set. Make the wheels transparent (bottom of list of textures) for one chair and have only the wheels showing for the other chair. This'll give you the chance to rotate your wheels. If you don't want to have your wheels move then skip this step. Load up a dummy axis and set it to be at the center of one wheel with the blue axis at right angles (perpendicular) to the wheel. Under content, load up the 360_z_anticlockwise animation (it's under animations,prop, rotations). Add the animation to your set. Now go to the Library folder in the Project bin and right click on that animation you just loaded. We are going to set the Cyclic tab to infinite under the Object Properties for that animation. Good. Now test your setting by clicking on the dummy and have it play the rotation animation. You use the waving hand icon. Your wheel should just keep turning and turning and turning. Click interrupt to stop it. Line up your wheels to the chair body and then link the dummy to the chair.
Set each sphere to the handles of the wheelchair so that the doc is in position. He'll end up real close to the back of the seat. O.K. now draw a path along the ground where you want them to go. Position both the doc and the chair to the start of the path. In direct mode, direct your chair to travel along the path, then do the same for your doc. You'll need to tweak the timeline elements until the two are travelling together. Don't forget to tell the dummy to play the rotation animation once the doc starts to walk and then interupt it when he stops.
Good luck! (thanks to Eric for the Cyclic tip)
I like to use little sphere's to control my character's hand and feet. The idea here is to create little spheres (about a fist size) and position them right on the wrist of the character. Now pin your guy's hands to the sphere. You'll find the other hand needs a correction rotation.
Once you have you hands pinned, it should look like he is wearing a sphere on each wrist.
I find it easier to position the hands now as the sphere size can be adjusted (using the scale tool )very quickly and the wrist joint can therefore be selected without having to go through the skeleton method.

Okay, now for the wheelchair. We'll get two chairs on our set. Make the wheels transparent (bottom of list of textures) for one chair and have only the wheels showing for the other chair. This'll give you the chance to rotate your wheels. If you don't want to have your wheels move then skip this step. Load up a dummy axis and set it to be at the center of one wheel with the blue axis at right angles (perpendicular) to the wheel. Under content, load up the 360_z_anticlockwise animation (it's under animations,prop, rotations). Add the animation to your set. Now go to the Library folder in the Project bin and right click on that animation you just loaded. We are going to set the Cyclic tab to infinite under the Object Properties for that animation.
Good. Now test your setting by clicking on the dummy and have it play the rotation animation. You use the waving hand icon. Your wheel should just keep turning and turning and turning. Click interrupt to stop it. Line up your wheels to the chair body and then link the dummy to the chair.Set each sphere to the handles of the wheelchair so that the doc is in position. He'll end up real close to the back of the seat. O.K. now draw a path along the ground where you want them to go. Position both the doc and the chair to the start of the path. In direct mode, direct your chair to travel along the path, then do the same for your doc. You'll need to tweak the timeline elements until the two are travelling together. Don't forget to tell the dummy to play the rotation animation once the doc starts to walk and then interupt it when he stops.
Good luck! (thanks to Eric for the Cyclic tip)
Here is Dr Phil taking another patient for an extreme makeover!