Saturday, December 6, 2008

make 'em jump


The library of character animations available within Antics is very large no doubt. But there are times when you need to have your character do things which are a little more custom built. Creating poses and blending to them will work quite nicely, as will importing .bvh animations (if you can find what you’re after).
But there are ways to set up your scene to get Antics to solve these custom moves for you. If you can get Antics do to do it realtime, then the process can be much faster.
For example, say I wanted my guy to run, then jump over something. Firstly, I set the walk (in properties:general:walks) to a run animation namely male_run.k3d so now wherever I direct him to go, he’ll get there real fast. Then I get him to perform the jump animation Jump_1.k3d
Ok so far so good. He runs, he jumps. Brilliant. But of course it’s very very unlikely the jump will take him the exact distance you have in mind, I mean, we could just let him drop into that lava pit, or croc pit or whatever he’s meant to be jumping over. So. Rather than go off in search of longer jumps, what if we move the room to make up the distance? If you setup a move on the room with him just standing there, you’ll see him move with the floor. So we simply setup the floor to move at the precise moment he leaves the ground, and have it stop moving just as he is to land.
Try it, it’s fun. In my example clip I moved the floor vertically as well, to get the guy to jump down to a lower level. Oh and then I added a little bounce off move using another jump and floor/combo.


As you can see I also changed the guy into a girl, it’s like a kill bill, bourne identity, bond thing now!
Moving the room also solved another problem I encountered a little while back. The idea was to have a whole bunch of shooters aim for the one target which was moving. The shooting animations in Antics are cool so I wanted to use those. Plus they work with the props! The solution was to put each shooter on a little room about the size of a floor mat. Then have these rooms hooked up to a cam. The room is linked to the cam.
The cameras (one for each room) are then told to target the target, (if you get what I mean). This way the target can move and the shooters won’t miss! You can get the cameras to look where ever you want, just make the target at ground plane level.
T.
(part 2 here)
Making the Fairy fly - Sketchup tip

In one of the packs was an angel, I thought it might be fun to go through the steps needed to make the wings of the fairy move. It’s possible to use the tab key to allow selection each wing, set a pose or two and then get the fairy to blend from one pose to another, but, I thought you might want to have a little more control, plus this way you can have your fairy free to do other stuff. (Like walking.)
For this you’ll need some eggs, a little flour and an inclinometer. (just kidding you won’t need the eggs!) Actually this process works best with photoshop and sketchup and of course Antics. We’ll be plucking the wings off our fairy and then sticking a couple of new ones on. So place the fairy on a new room. To remove the original wings, right click the fairy, choose textures then right click on the wings.ksh texture in the list, to select edit. Under the colour tab you can set the transparency to 100%. So now you have a wingless fairy. Not bad looking as a female character, bar the ears and the ridges in her back!.
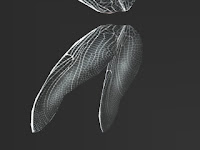
The next step is to set up for creating or own wings. We do this by importing a new fairy and positioning her so that all we see is the wing sticking up through the floor like a wing shaped floor mat. (Turn off the snap to position,rotation option.) Line your camera up to this wing and when it’s large in frame save out a single frame. This’ll be what we use the create and texture our new wing. Your wing should look like this…….
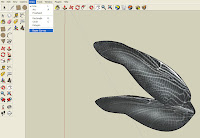
Using sketchup, import the wing still frame (as an image) so that we can trace the shape. I found a Bezier Curves plugin for Sketchup which made the job much easier. Once you have a completed the outline of your wing, you can import the stillframe again (as a texture) and apply it to the surface. A little scale/rotate/position fiddle and we are all set. Remember to do the other side as well. Ok now save the .skp file as wing.skp then back into Antics and jump into the file/import and select your wing.skp
All good. So now you should have a wing and a wingless fairy. At this point I saved the Antics project. When you do this you can access the texture map being applied to the new wing so that you can set the look of it to match the original wing texture map. These maps are found in a “maps” folder within the saved project. The original wing was mapped with a fairy_hair_wings.tga file. If you want the new wing to be identical to the original you’ll need to use photoshop to match the RGBA channels. Otherwise you could set the transparency value so the new wing has the look you want.
The next part of the process is to get the new wings flapping. As usual, I’ve gone for the old, “use a camera to create a motion curve” trick. If you haven’t heard of it before, it goes something like this. Put a freecam in the spot where you want an animatable axis of some sort. Link the asset/prop to this freecam. Now use the pan, tilt and dolly values to drive your prop. In this way the values are recorded via the camera’s motion curve, and therefore editable. For the wings, make sure the pivot point is in the right spot, then link each wing to it’s own freecam, which you put, right on the ridge on the back of our wingless fairy. It’s useful to have two viewports open. One is the Mastercam, framed so you can see the whole wing, (say from the top). The other viewport (which you make active) is to see what the freecam is looking at. When you pan left, the asset will swivel to the left. Make sure the freecamera animation is recorded in the timeline.
Once you’ve got your cameras doing their thing, link them to your fairy. Now she is free to be directed, and the wings will perform on cue.
Have fun.
T.

speed utility


Trolling through the old forum I found this speed utility created by Col Klink.

Friday, December 5, 2008

Using Machinima to teach film

Using machinima to teach film
Machinima has the potential to be a powerful tool for teaching film-making techniques. It has several advantages over existing 3D animation technologies such as Max or Maya. The film-maker doesn’t need any knowledge of 3D animation techniques – controlling the characters is as easy as playing a computer game. The virtual world is “live” - in other words, everything takes place in real time, and so it feels more like directing on a real set.

The disadvantage of using machinima is ......................
(article continued in comments section)
 
----------------------
Thanks go to
Matt Kelland, Short Fuze, for writing this article.

New emotional characters


Here's a sneak preview of the upcoming new emotional characters.
Keep a lookat at the Antics download page.

Tuesday, December 2, 2008

New forum - Antics

here
Invitations to JRay, Colonel Klink, Ricky, InfoCentral, AnticsFife, afterThought, dazza101, klate & Michael and to all current and future users of Antics. All are welcome. Learners especially welcome.

to be honest - the artist formerly known as Antics


There's a lot to be said for the Gordon Ramsey way of expressing yourself. Shooting straight from the hip and getting on with it. I started as a beta tester for v2 and have been fortunate to have been commissioned a number of times for various demo pieces. Like a couple of other select few, I was asked to join the moderating team on the official forum and contribute to the official blog. So it certainly surprised me with the nov 28 news and now with the closure of the web site/forum. (F**K!) Like many others I have invested way too much time in getting across the product to just let it slide. When I setup my little previz shop under the name AMMO PREVIZ, I thought I had identified a future market. The concept was "AMMO" : to provide ammunition to the previz creator. I choose Antics at that point as it was the only one I felt suited my creative and 3d skill set. Even with the current owners orphaning the child, I can see plently of growth possible. This one product is in use by around 20,000 people. The best solution available to us all is one which takes into account the most popular features. Without taking away any credit for the artists formerly know as Antics developers, the product evolved in part as a result of our community feedback. So we do owe it to ourselves to keep the momentum going. So lets take the batton, stir the pot and work on that F***ng recipe. Please leave your mark for what worked best for you, in the comments section.

Monday, December 1, 2008

Keeping the Blog afloat.

Fellow survivors, feel free to use this forum ,or use the shout box on this blog, or just post comments as you wish. If any one is keen enough to help with posts etc, let me know.
Here to help.
T

lights are on, nobody's home - Moviestorm anyone?

The Antics site is closed. For some registered users, you can continue to download the 1.1 gb content file as well as the v5 installer.If you are having logon trouble, perhaps try brad
or support
I am wondering about v5.1 and reported new emotion characters.


video


Here's hoping Matt K or David B (Moviestorm) will shed some light as our crew of 20,000 decide whether to sail on or jump ship......I can hear the band is still playing.......lovely music......nice night for a cruise... pity it's so cold out.....hmmmmm what's that lump of ice ahead.
T.

Sunday, November 30, 2008

Indiana Clone

thanks to afterthought for finding these iclone examples.