In one of the packs was an angel, I thought it might be fun to go through the steps needed to make the wings of the fairy move. It’s possible to use the tab key to allow selection each wing, set a pose or two and then get the fairy to blend from one pose to another, but, I thought you might want to have a little more control, plus this way you can have your fairy free to do other stuff. (Like walking.)
For this you’ll need some eggs, a little flour and an inclinometer. (just kidding you won’t need the eggs!) Actually this process works best with photoshop and sketchup and of course Antics. We’ll be plucking the wings off our fairy and then sticking a couple of new ones on. So place the fairy on a new room. To remove the original wings, right click the fairy, choose textures then right click on the wings.ksh texture in the list, to select edit. Under the colour tab you can set the transparency to 100%. So now you have a wingless fairy. Not bad looking as a female character, bar the ears and the ridges in her back!.
The next step is to set up for creating or own wings. We do this by importing a new fairy and positioning her so that all we see is the wing sticking up through the floor like a wing shaped floor mat. (Turn off the snap to position,rotation option.) Line your camera up to this wing and when it’s large in frame save out a single frame. This’ll be what we use the create and texture our new wing. Your wing should look like this…….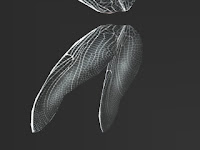
Using sketchup, import the wing still frame (as an image) so that we can trace the shape. I found a Bezier Curves plugin for Sketchup which made the job much easier. Once you have a completed the outline of your wing, you can import the stillframe again (as a texture) and apply it to the surface. A little scale/rotate/position fiddle and we are all set. Remember to do the other side as well. Ok now save the .skp file as wing.skp then back into Antics and jump into the file/import and select your wing.skp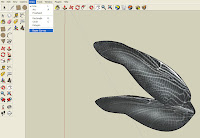
All good. So now you should have a wing and a wingless fairy. At this point I saved the Antics project. When you do this you can access the texture map being applied to the new wing so that you can set the look of it to match the original wing texture map. These maps are found in a “maps” folder within the saved project. The original wing was mapped with a fairy_hair_wings.tga file. If you want the new wing to be identical to the original you’ll need to use photoshop to match the RGBA channels. Otherwise you could set the transparency value so the new wing has the look you want.
The next part of the process is to get the new wings flapping. As usual, I’ve gone for the old, “use a camera to create a motion curve” trick. If you haven’t heard of it before, it goes something like this. Put a freecam in the spot where you want an animatable axis of some sort. Link the asset/prop to this freecam. Now use the pan, tilt and dolly values to drive your prop. In this way the values are recorded via the camera’s motion curve, and therefore editable. For the wings, make sure the pivot point is in the right spot, then link each wing to it’s own freecam, which you put, right on the ridge on the back of our wingless fairy. It’s useful to have two viewports open. One is the Mastercam, framed so you can see the whole wing, (say from the top). The other viewport (which you make active) is to see what the freecam is looking at. When you pan left, the asset will swivel to the left. Make sure the freecamera animation is recorded in the timeline.
Once you’ve got your cameras doing their thing, link them to your fairy. Now she is free to be directed, and the wings will perform on cue.
Have fun.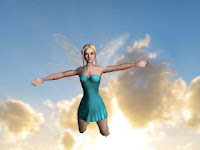
T.
For this you’ll need some eggs, a little flour and an inclinometer. (just kidding you won’t need the eggs!) Actually this process works best with photoshop and sketchup and of course Antics. We’ll be plucking the wings off our fairy and then sticking a couple of new ones on. So place the fairy on a new room. To remove the original wings, right click the fairy, choose textures then right click on the wings.ksh texture in the list, to select edit. Under the colour tab you can set the transparency to 100%. So now you have a wingless fairy. Not bad looking as a female character, bar the ears and the ridges in her back!.
The next step is to set up for creating or own wings. We do this by importing a new fairy and positioning her so that all we see is the wing sticking up through the floor like a wing shaped floor mat. (Turn off the snap to position,rotation option.) Line your camera up to this wing and when it’s large in frame save out a single frame. This’ll be what we use the create and texture our new wing. Your wing should look like this…….

Using sketchup, import the wing still frame (as an image) so that we can trace the shape. I found a Bezier Curves plugin for Sketchup which made the job much easier. Once you have a completed the outline of your wing, you can import the stillframe again (as a texture) and apply it to the surface. A little scale/rotate/position fiddle and we are all set. Remember to do the other side as well. Ok now save the .skp file as wing.skp then back into Antics and jump into the file/import and select your wing.skp

All good. So now you should have a wing and a wingless fairy. At this point I saved the Antics project. When you do this you can access the texture map being applied to the new wing so that you can set the look of it to match the original wing texture map. These maps are found in a “maps” folder within the saved project. The original wing was mapped with a fairy_hair_wings.tga file. If you want the new wing to be identical to the original you’ll need to use photoshop to match the RGBA channels. Otherwise you could set the transparency value so the new wing has the look you want.
The next part of the process is to get the new wings flapping. As usual, I’ve gone for the old, “use a camera to create a motion curve” trick. If you haven’t heard of it before, it goes something like this. Put a freecam in the spot where you want an animatable axis of some sort. Link the asset/prop to this freecam. Now use the pan, tilt and dolly values to drive your prop. In this way the values are recorded via the camera’s motion curve, and therefore editable. For the wings, make sure the pivot point is in the right spot, then link each wing to it’s own freecam, which you put, right on the ridge on the back of our wingless fairy. It’s useful to have two viewports open. One is the Mastercam, framed so you can see the whole wing, (say from the top). The other viewport (which you make active) is to see what the freecam is looking at. When you pan left, the asset will swivel to the left. Make sure the freecamera animation is recorded in the timeline.
Once you’ve got your cameras doing their thing, link them to your fairy. Now she is free to be directed, and the wings will perform on cue.
Have fun.

T.
No comments:
Post a Comment